Smart Phone Remote Controller ● Widespread Compatibility: Your smartphone can function effectively with the standard connector that is frequently used to replace iOS cellphones.● Plug and Play: Your smartphone may become an…
How To add Fortinet Fortigate to Eve-ng

integrating Fortinet FortiGate into EVE-NG can be a valuable addition to your network simulation toolkit.
By following these steps, you’ll be able to effectively set up and utilize FortiGate in EVE-NG to test and optimize your network configurations, helping you enhance your network management skills and ensuring a more secure and efficient network infrastructure.
Adding Fortinet FortiGate to EVE-NG can significantly enhance your network virtualization capabilities, allowing you to simulate and test various network configurations in a controlled environment.
To achieve this, you will need to follow a few steps to successfully integrate FortiGate into EVE-NG. Below is a step-by-step guide to help you with the process:
Step 1:
Obtain the FortiGate Image First and foremost, you need to acquire the FortiGate virtual appliance image.
Ensure that you have a valid license for the image that you are using for the simulation.
You can obtain the FortiGate image from the official Fortinet website or from authorized Fortinet partners.
Step 2:
Launch EVE-NG and Access the Web Interface Once you have the required FortiGate image, log in to your EVE-NG server or launch it through your preferred virtualization platform.
Access the EVE-NG web interface by typing the server’s IP address in your web browser.

How To learn to Protect AWS with Fortinet Fortigate Firewalls
learn Protect AWS with Fortinet Fortigate Firewalls learn protect AWS with Fortinet By following these steps, you can effectively protect protect AWS with fortigate firewall Here presenting a good course on this you can learn a lot more from it. What you’ll learn in this protect AWS with fortigate firewall course This protect AWS with fortigate firewall course includes: In this courses, feature lecture and hands-on labs, you will learn to install, configure, manage and troubleshoot FortiGate…
Step 3:
Upload the FortiGate Image to EVE-NG In the EVE-NG web interface, navigate to the “Images” section and click on “Browse” to select the FortiGate image file you acquired earlier.
Then, click on the “Upload” button to add the FortiGate image to your EVE-NG library.
Step 4: Create a FortiGate Node After the image is successfully uploaded, go to the “Nodes” section in the web interface.
Click on the “Add New Node” button and select the FortiGate image from the dropdown menu.
Assign a name and configure the node settings such as CPU, RAM, and interfaces as per your requirements.
Step 5:
Start the FortiGate Node Once the FortiGate node is created, right-click on it, and select “Start” from the context menu. The FortiGate virtual appliance will start booting up.
Step 6:
Access the FortiGate Console Once the FortiGate node is running, right-click on it again and choose “Console” from the context menu.
This will open a console window that will display the FortiGate boot process and configuration setup.
Step 7:
Complete the FortiGate Configuration Follow the on-screen instructions to set up the FortiGate appliance.
You will need to configure the basic network settings, interfaces, and any other relevant parameters for your simulation.
Step 8:
Connect FortiGate Node to Other Nodes (Optional) You can now connect the FortiGate node to other virtual nodes within EVE-NG.
This allows you to build complex network topologies and test various network scenarios.
FortiGate Firewall Version 6.4 NSE4 Training
Description of FortiGate Firewall course In this courses, feature lecture and hands-on labs, you will learn to install, configure, manage and troubleshoot FortiGate Networks firewalls, gaining the skills and expertise needed to protect your organization from the most advanced cyber-security attacks. The student will get hands-on experience in configuring, managing, and monitoring a firewall in a lab environment. This class covers many topics required for NSE-4 Certificate and new topics are added frequently. This course dives deeper…
Here is the Fully Practical Method:
1. Download Fortinet Images Eve-ng
Filename: fortinet-FGT-v5-build1484
Version: FGT_VM64_KVM-v5-build1484-FORTINET.out.kvm.zip
https://drive.google.com/open?id=16YEqoAZxcsIkRk38-OvPuxFkJbhR_fR9
or user the company website
https://support.fortinet.com/Download/FirmwareImages.aspx
2. Create Fortinet Folder to upload Fortinet image to Eve-ng.
mkdir /opt/unetlab/addons/qemu/fortinet-FGT-v5-build1484
3. Upload the downloaded Fortinet image to the EVE-ng.
Upload the image to folder Fortinet which we have already created in the previous step. Use any way to upload or copy the image to the eve, you can use FileZilla or WinSCP to upload the image to the following path: /opt/unetlab/addons/qemu/fortinet-FGT-v5-build1484/
4. From the EVE cli, navigate to the folder just created
cd /opt/unetlab/addons/qemu/fortinet-FGT-v5-build1484/
5. Unzip original filename
unzip FGT_VM64_KVM-v5-build1484-FORTINET.out.kvm.zip
6. Rename original filename to virtioa.qcow2 and remove original zip file.
mv fortios.qcow2 virtioa.qcow2
rm FGT_VM64_KVM-v5-build1449-FORTINET.out.kvm.zip
7. Fix the permissions:
/opt/unetlab/wrappers/unl_wrapper -a fixpermissions
Now Go to Eve-ng, then add node and the Fortinet fortigate will be available. The default username/password for fortigate firewall as following: username:admin
and no password.
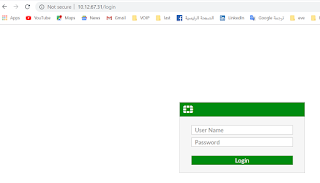
8.Initial Configuration:
FortiGate-VM64-KVM # config system interface
FortiGate-VM64-KVM (interface) # edit port1
FortiGate-VM64-KVM (port1) # set ip 10.12.67.31 255.255.255.0
FortiGate-VM64-KVM (port1) #end